

Sinister Obsession Scenario Walkthrough
Welcome!
Hi everyone!
I’m Noël Hollis, the Student Ambassador for KASE Scenarios!
I’m here to help y’all, our students, with useful write-ups and walkthroughs, resources and general tips and tricks for solving our OSINT scenarios! I also have my own blog where I dive into different OSINT topics as I work on transitioning to a career in the industry. Check out my blog here.
Today we’re going to look at how I approached the challenges in Sinister Obsession and how I was able to work through it as a beginner OSINT analyst.
If you haven’t signed up for Sinister Obsession already I highly recommend doing so!
Sinister Obsession is the fourth OSINT scenario from KASE Scenarios and it’s the first beginner law enforcement scenario. I always love how each scenario has a list of skills you learn that are clearly laid out on the scenario page, so you know exactly which skills you’ll be practicing.
NOTE: THIS WALKTHROUGH CONTAINS SPOILERS FOR QUESTIONS IN SINISTER OBSESSION
If you’re okay with spoilers, then let’s move on to some of the things that we’re going to learn.
The one that most interested me this time is the one in red below.
This scenario is a beginner friendly introduction to several OSINT topics:
- Username enumeration and social media intelligence
- Geolocation: Visually extracting data from an image to answer contextual questions
- Pivoting on key data points to uncover the identity behind an anonymous alias
It’s always been a curiosity of mine as to how easy, or hard, tracking down someone by an alias actually is. I knew it was doable, but not how much work you may have to put into it. I figured this scenario would introduce me to the techniques used to do exactly that; Figuring out who’s hiding behind an alias.
Much like our other walkthroughs I’m only going to showcase the steps that I took to find the answers. That way you can read this if you’re stuck or need a nudge in the right direction without seeing what the actual answer is!
Before We Start
First, make sure you read through the welcome screen to get a more thorough run down of the skills we’ll be practicing. It always helps to start with an understanding of where you’re trying to go.
Second, pull out your favorite note taking app. I use Obsidian, but even a pen and paper works. We just want to keep track of the things we find so that we can reference them quickly and easily later.
Third, grab a coffee, tea, or your favorite beverage and settle in for some OSINT.
Welcome
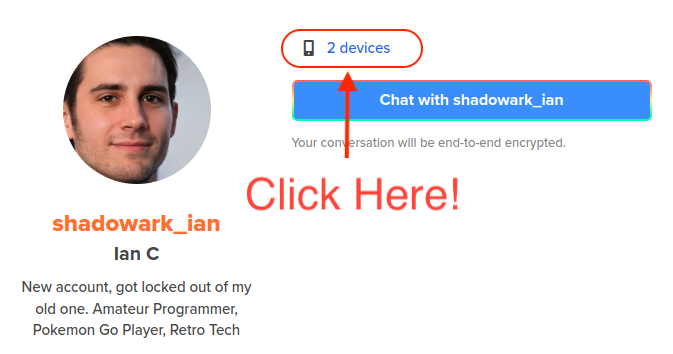
You start out this scenario by speaking with your colleagues at the National Crime Agency. They tell you about Sophia Blake, a popular singer who is experiencing stalking and cyber harassment. After a recent interview on the Good Morning Britain show things escalated and now there are real concerns that whoever is stalking her might do something more serious.
You are then presented with a screenshot of an unknown communication platform:

One of the first things that I always do with cases, is I create an Obsidian Vault. Obsidian is a great note taking tool because you can link the notes you take together via hashtags and then generate what I call a ‘Murder Board’, much like this, but digitally:

This is my beginning one for Sinister Obession – the white rectagles are answers, so that’s why they’re there.
But as you can see, we are able to see that Ian and Sophia have connections directly and through one node. As you fill more information out in Obsidian and link the pages together this map will build on itself.
More information on linking in Obsidian, here. I highly suggest reading through their quick start guide if you are interesed in using Obsidian as a note taking tool.

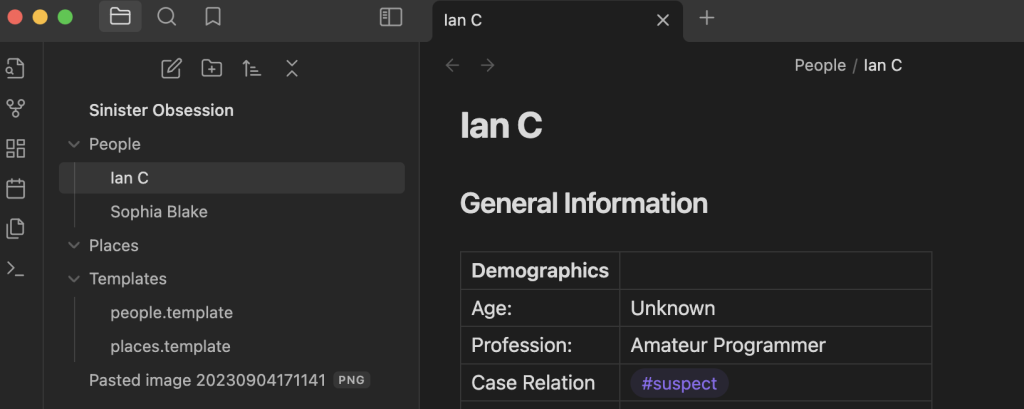
In this case I made a note for Sophia, and a note ‘Ian C’ for the name in the screenshot you are given. In these profiles I like to put any basic demographic information I have for the persons involved in the storyline. This includes things like name, age, profession, height, weight, etc.
They will also occasionally include demographic data that is related to the specific scenario that I’m working on. For this particular scenario I also added in a segment for ‘Social Media’ since that was initially relevant to the case.
As we go through this – I’ll mention I ‘noted’ something and this is what I mean, adding it to some type of a profile in my personal notes.
On to the first challenge!
Cryptic Chat Challenge
Q1 – Which site is this image from?
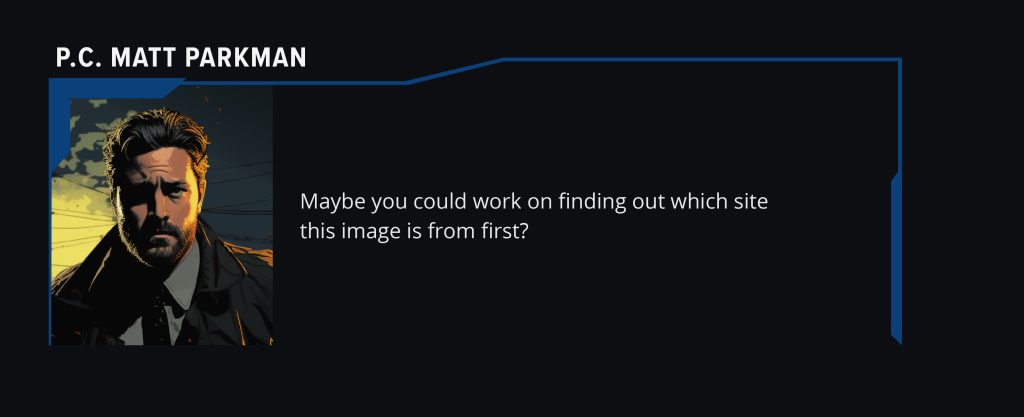
The first question you are asked is to find out what chat platform the screenshot Sophia saved was from.
As a reminder, it looks like this:
As I looked through this image, I made sure to note down all of the information that it had in it, such as the profile image, the devices count, some unique statements in the bio part and how he used his name in his username as well.
If you want a more detailed run down of this analysis, hop over to the hint video I did on this chain of questions. It will also walk you through the steps I went through to solve this, but I also get that sometimes written instruction is better, so we will also continue to walk through it on the blog.
But, we’re interested in what happens after we analyze the image we have there.
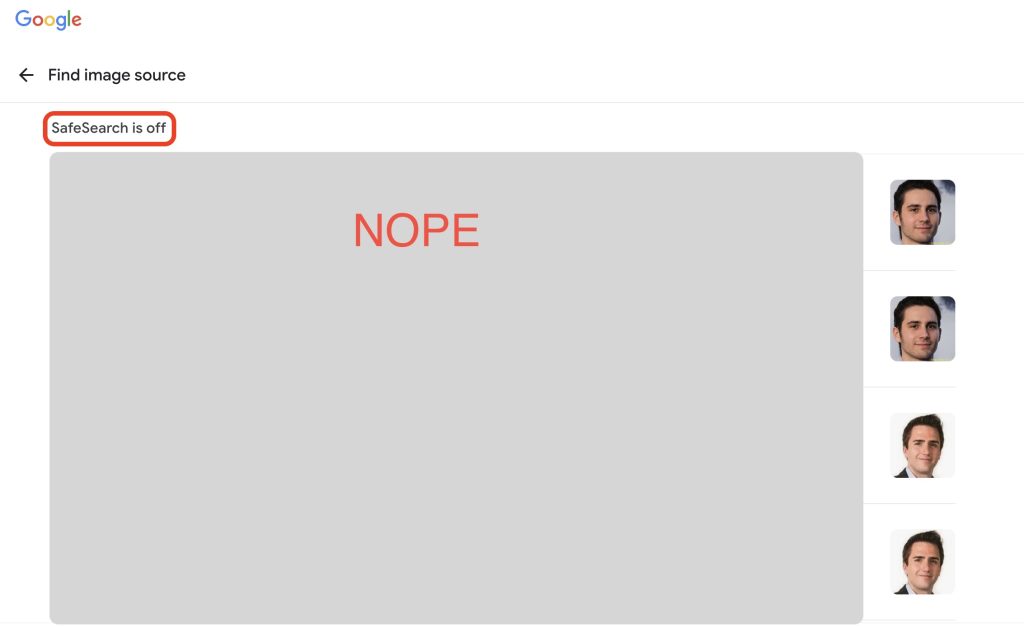
My initial reaction to any image I am given, ever, is to immediately throw it in Google Images – so let’s see how that turned out for me:

As you can see – that was a whole hunk of nope.
But! Not to worry, there is another part of this that is very helpful – the ‘Find Image Source’ button.
I almost always forget about this – but it can be insanely useful, let’s see if it lives up to it’s reputation in this case as well.
Looks like it did!
There are actually two hits on the image, but I’ll leave it up to you now to figure out the right one.
Also! Remember to take your Safe Search off – we live on the wild side in OSINT.
Q2 – When was the profile picture taken?
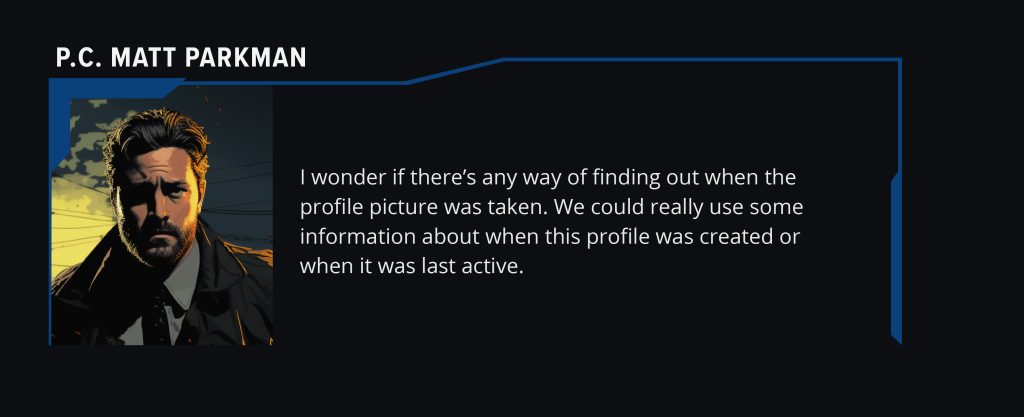
Honestly, I kind of stumbled into this one, which is fitting for the OSINT experience I’ve had so far. Spiraling down a path sometimes becomes useful.
This is one of the few images I didn’t throw into Google Images, because I’d essentially already done that above, so I went to my second image step – EXIF data.
EXIF stands for Exchangeable Image File Format.
EXIF data is a standard that stores information about images and other media captured by a digital camera. If it’s attached to an image, it can be a wealth of information.
If you’re on a Windows machine, this is pretty easy to grab, but if you’re on a Mac, like me, you’ll have to do a little more work, there are sites out there that will help us, I personally use Fotoforensics.
However, I’m sure you’re thinking to yourself:
“But, Noël, the image you have is a screenshot, what kind of EXIF data will that have?”
You’d be right to ask that, but I won’t be using that particular image in this case – I’m going to grab a much better image – the one that’s on his profile.
I’m going to right click and ‘save as’ that image.

But before I throw it in the EXIF data tool – I’m going to open that image to make sure it’s not just the same thing as the circle I can already see.
Now that’s where I will leave you on this one, as I think you have a date with the answer.
Q3 – How is he operating?

Now we get to put those notes to work – remember how we noted down that there was a ‘devices’ link above? Let’s go check that out.
When we click on that we then see a list of devices – but I’ll leave you to delve through that yourself.
Q4 – Where’s the other you?
Now Matt wants you to find the suspects whole name, because, he’s right, looking for an ‘Ian C’ is going to be tough. However, we have a secret tool, our notes!
Remember when we noted down that it said he was locked out of his old account? We know that it exists, but where?
Something I noticed when I did the TraceLabs CTF was that when people had second accounts to their social media, a lot of times they followed their old accounts with their new ones. It’s one of the ways I ended up digging up even more family members on one of the Missing Persons we were looking for information on.
So, let’s see who Mr. Ian follows.

Hmm, nothing good in that list, but there’s one more person on there, so let’s see who that is…. which I will leave to you to discover.
Q5 – How Many devices can one man have?

So, now we want to see what other devices we may have on this older account – we’re pretty familiar with devices now, so I’ll leave it to you to click on the link, just for the second account this time.
Pretty Good Privacy
Q1 – What is the name associated with this PGP key?
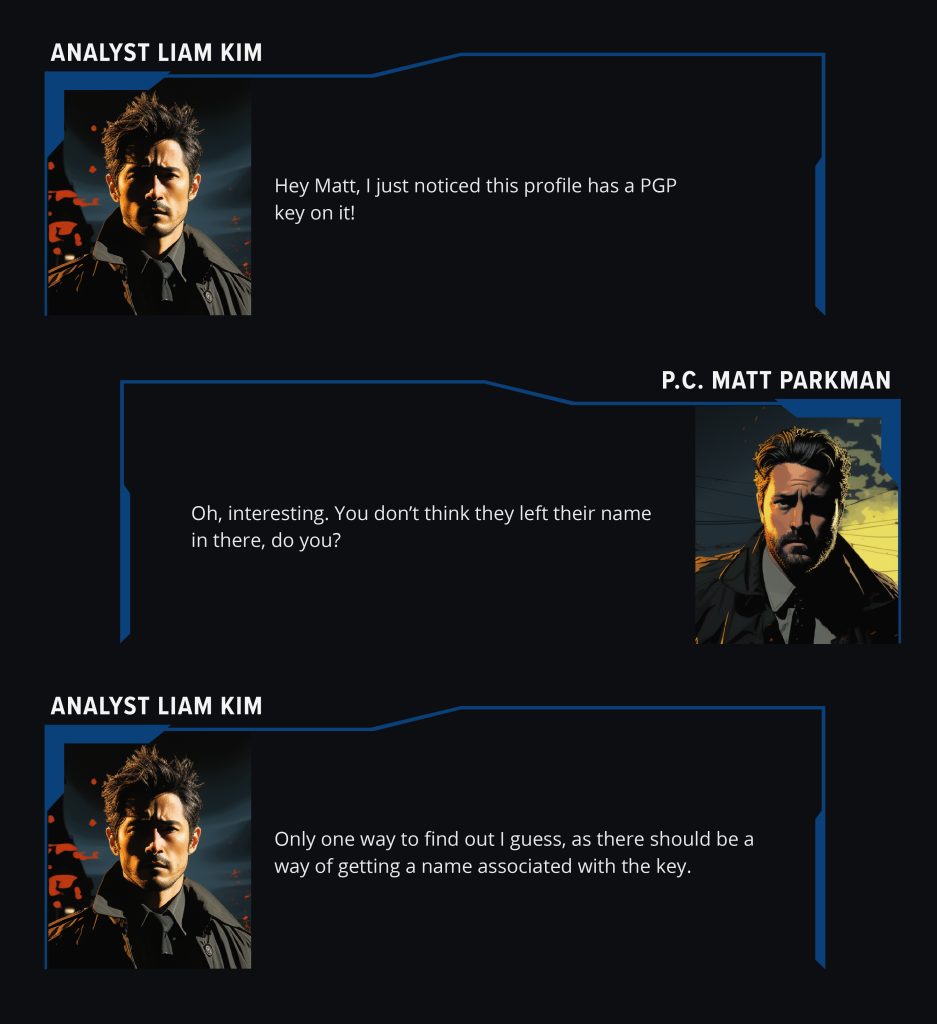
This has to be my favorite question of the lot.
If you want some more information on pivots with GPG keys, check out this post on the KASE Blog
I always enjoy digging around in various technical pieces of things, and this one gave me a lot to dig around on.
First – I knew that PGP keys existed, but I had NO idea what they actually did, so we had to do a little googling. I’m using the new Google generative Ai beta, so it gave me a pretty good summary rundown.
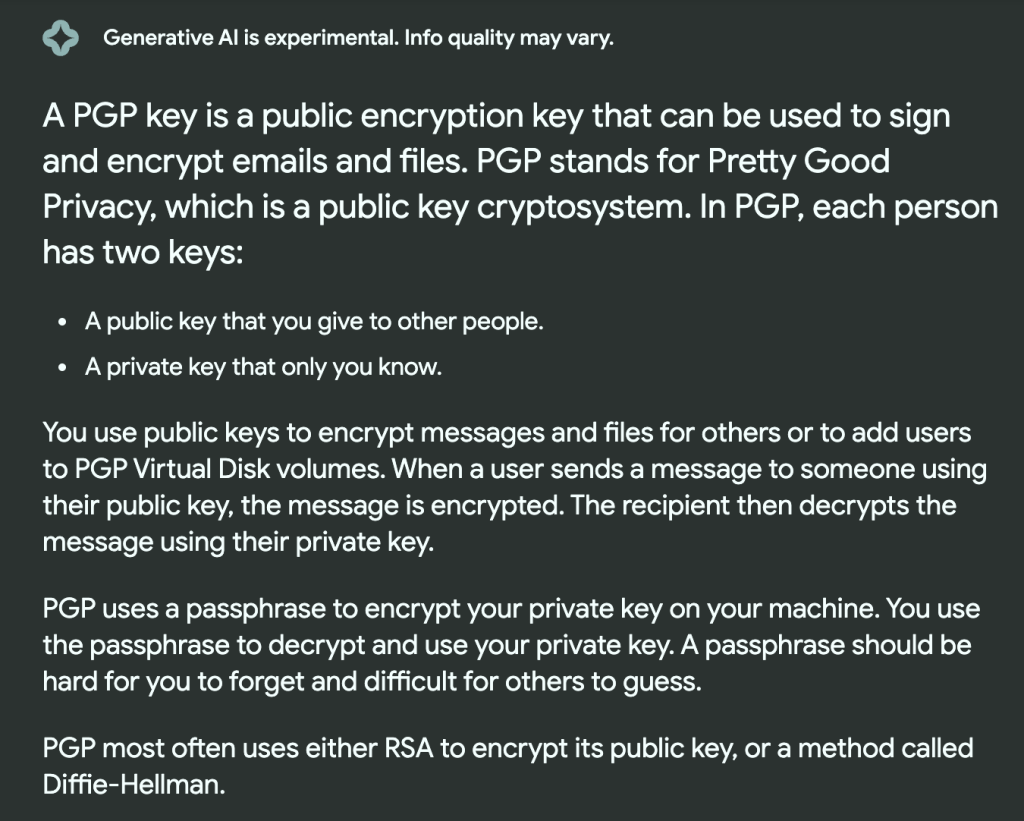
Okay, so now that we know what a PGP key is and what it is supposed to do, it makes a little more sense as to why you might be able to get a name out of it. That’s the next problem though…. how in the world do we do that?
Again – this will take another Google session.

It’s almost like she knows us by now.
So let’s see how well she knows us.
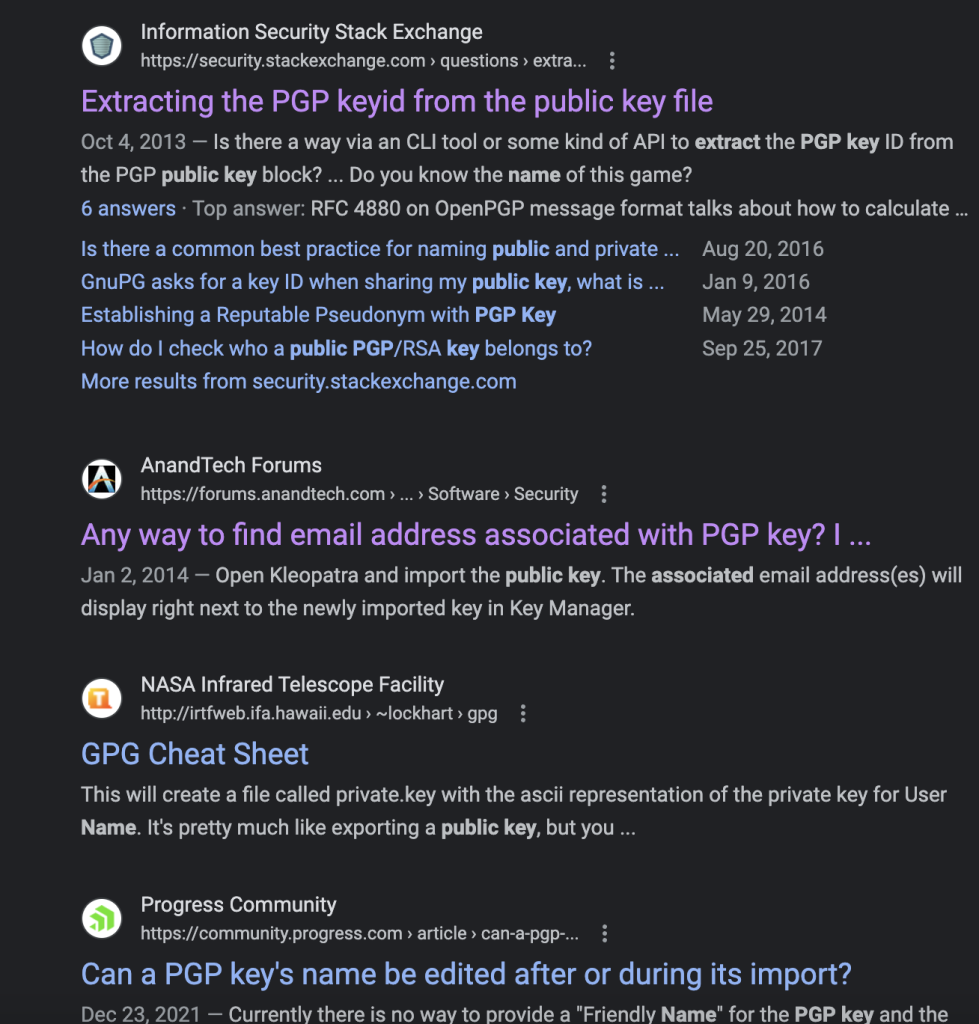
I’m not going to subject you all to my massive amount of scrolling and reading through posts on technical forums to decide to change my google search entirely.
The next one I tried was this:

I don’t know why I thought putting another ‘name’ in there was going to help, but I did it anyway, and started scrolling again.
This time though, there was a title that piqued my interest.
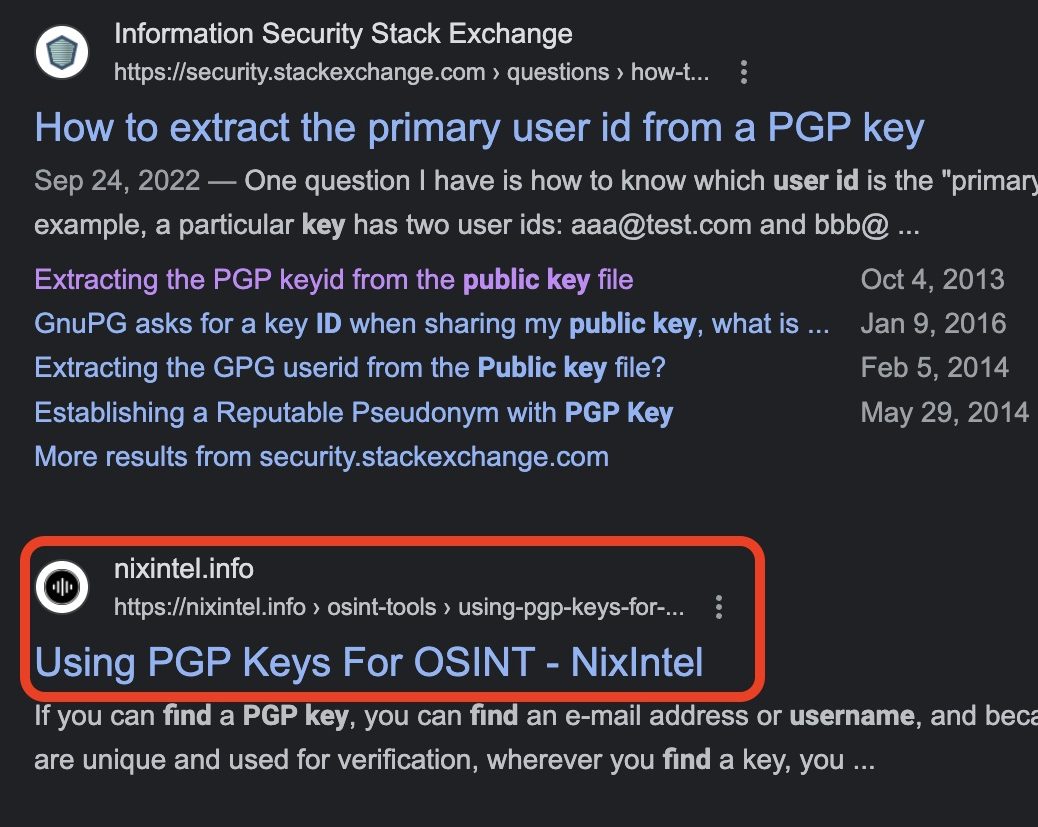
Looks like something we’d be interested in, doesn’t it? So we’re going to delve into that post.
[Link to Full Post]
NixIntel [Their Twitter Here] has a great first part on general PGP key information, and I highly reccomend reading through that as well, but I’m going to jump to the ‘finding the name’ part that I used. Since I’m on a Mac, I already happend to have Homebrew. I highly reccomend it, as it makes doing things in the CLI way more convenient.
There are a ton of things you can install easily with Homebrew. Below is a link on how to install it – I’m not going to post a screenshot of my terminal with a bunch of OSINT professionals and hopefuls running through this post.
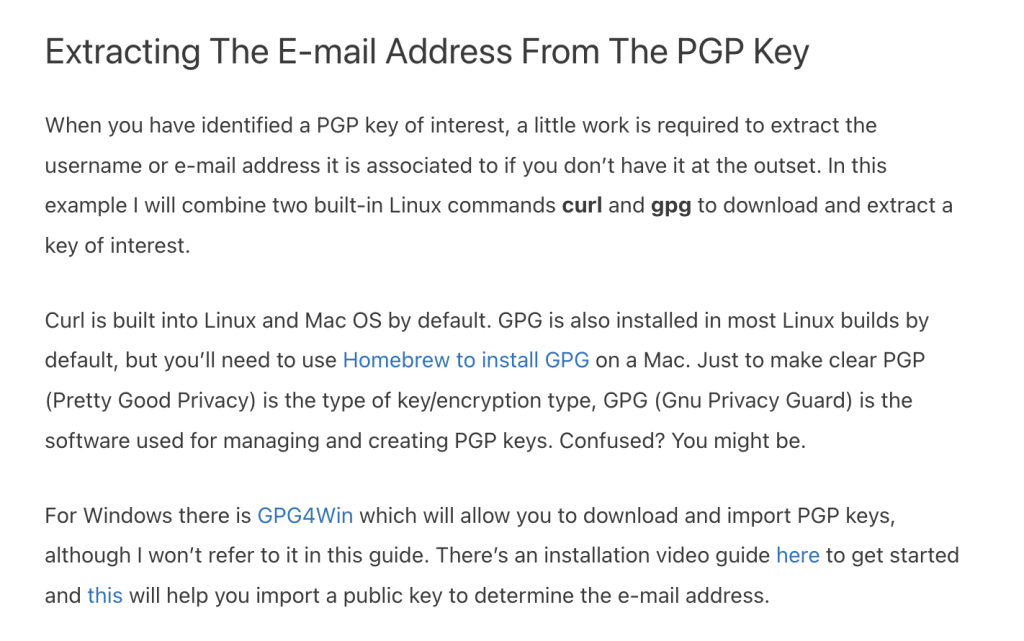
I know this says extracting the email and not the name, but bear with me for a minute.
Okay – so we’ve either installed GPG with Homebrew or GPG4Win – what do we do next?
Well, since we know what we have to do with it now, let’s go grab that GPG key.
You can see the key on the top of the second Keybase account that we found:

And when we click on that we get:
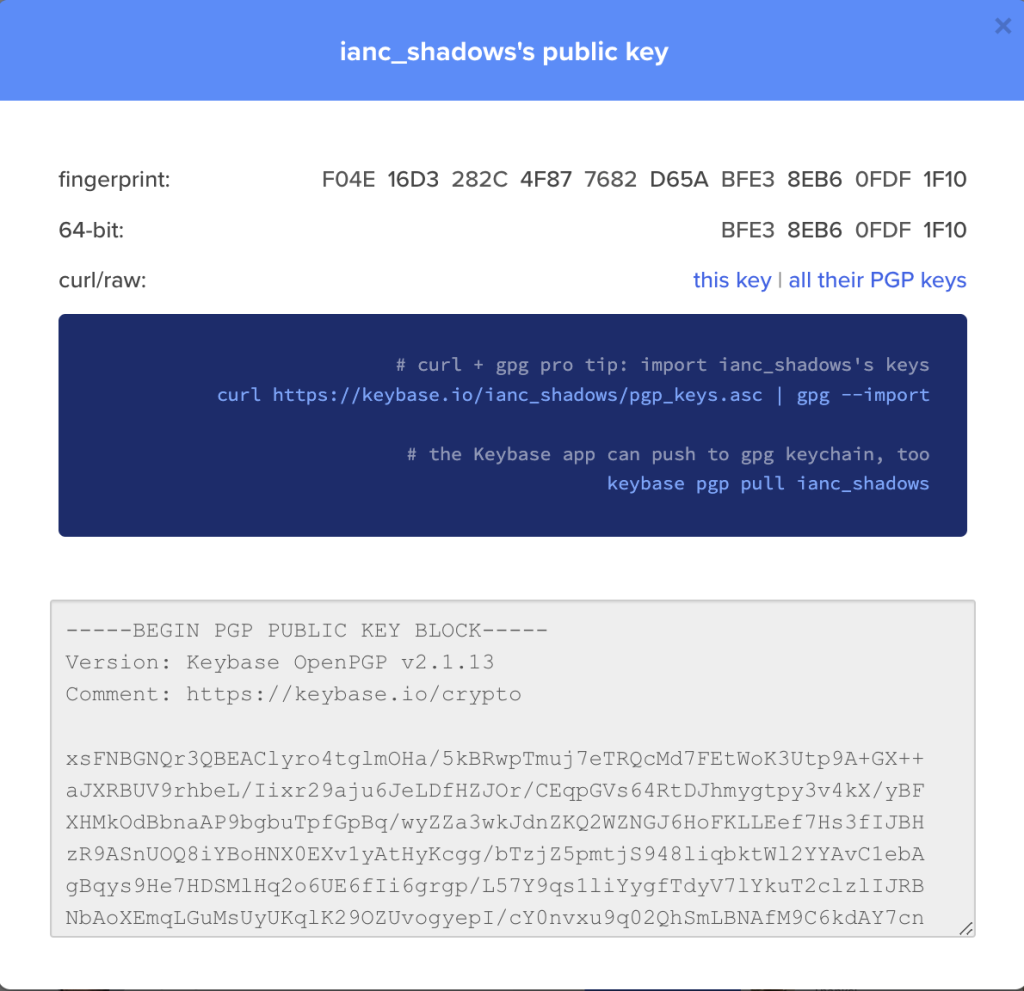
Okay, so we’ve got all of our ingredients…. lets cook us a PGP key.
The article has how to extract info from a PGP key from peegeepee.com in the first part, but we don’t have our PGP key from there, but if you keep scrolling you’ll see that they also cover Keybase.
[Here is a link to Leslie Carhart’s Twitter as well, so you can see her great posts]
So now we scroll down to the how part of the article and it gives us a Curl command that we can put in the CLI with our POI’s keybase link:

So let’s put that in and see what we get. I’ll let you do that yourself, because it’s always fun to see terminal output generated.
Digital Footprint
Q1 – Is there something that will help you find more of Ian’s accounts?
We already have some experience with this, since we found his operating system earlier in the scenario, so, let’s start with his first account:
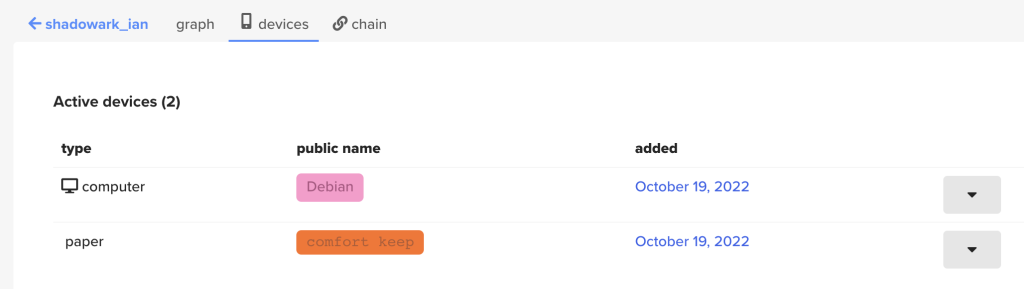
Sweet! We’ve found where the devices are added, and when they were added, but that doesn’t seem to give us any more information about other accounts, but we still have quite a few leads we can follow here. There are the dropdown arrows next to the accounts, as well as the tabs above.
Let’s start with the drop down arrows.

Nope, that just gives us signing keys. So, onto the tabs in the top, I’m going to start with the ‘chain’ tab.
Nope, not the things we want in there. Let’s try the ‘graph’ tab next.
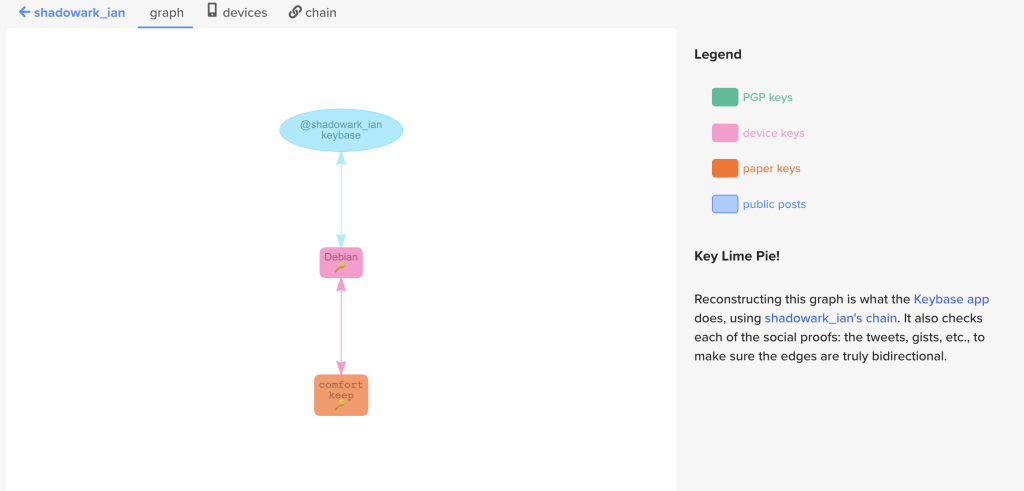
Nope, nothing there for us, but we still have a whole second account to go to. Hopefully since that was his older account there’s more information there.
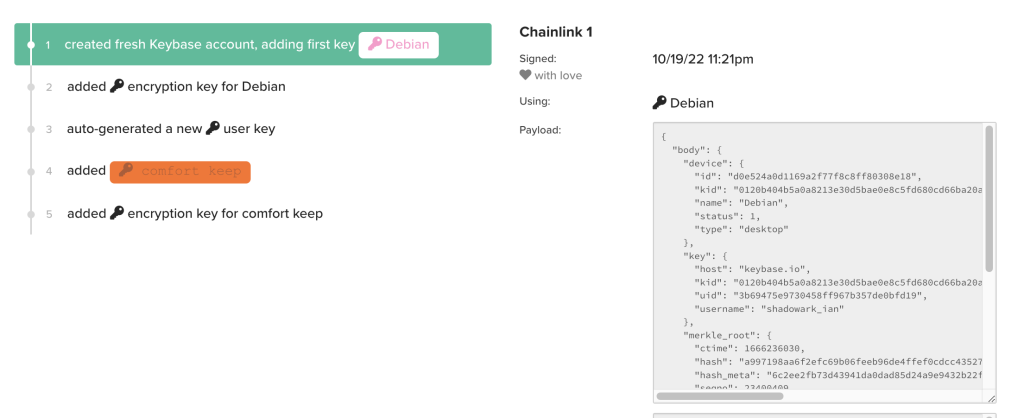
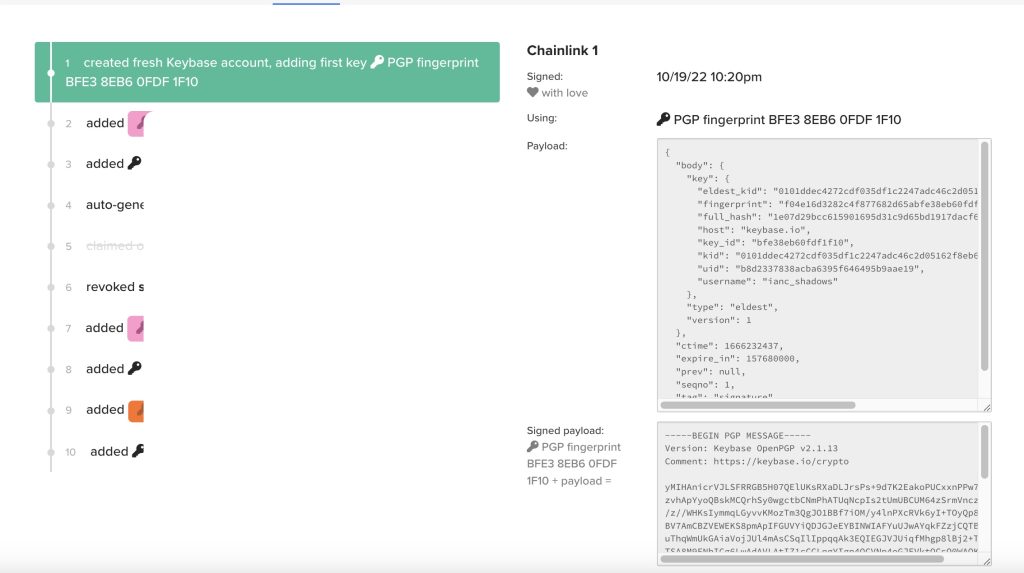
Since we know where the devices link is, and that the dropdown arrows don’t give us anything that we’re looking for, I’m going to start with the ‘chain’ tab on this account.
Now, this page looks like it might have something. So I will leave you to find it.
I will admit that the first time I got here I didn’t get the answer, because I didn’t follow my own rule of systematically going through the information that is here and noting it down. I highly reccomend doing that, especially here.
Q2 – Where is this weird name?

Now we need to find where this name is used, all this will take is some close reading where you already are from the previous question.
Github Exploration
Q1 – Can you find Ian’s email from his Github account?

Now, I happen to know that you can do this from a previous OSINT quiz, but I can’t remember the exact way to do it. I just know it has something to do with commits.
So ,we’re back to our old friend google.
I did a quick search on ‘get hidden email github commit‘ and got quite a few results, but the one I remembered using before popped up – and since google holds pretty much everything you ever do – it was helpfully colored purple.
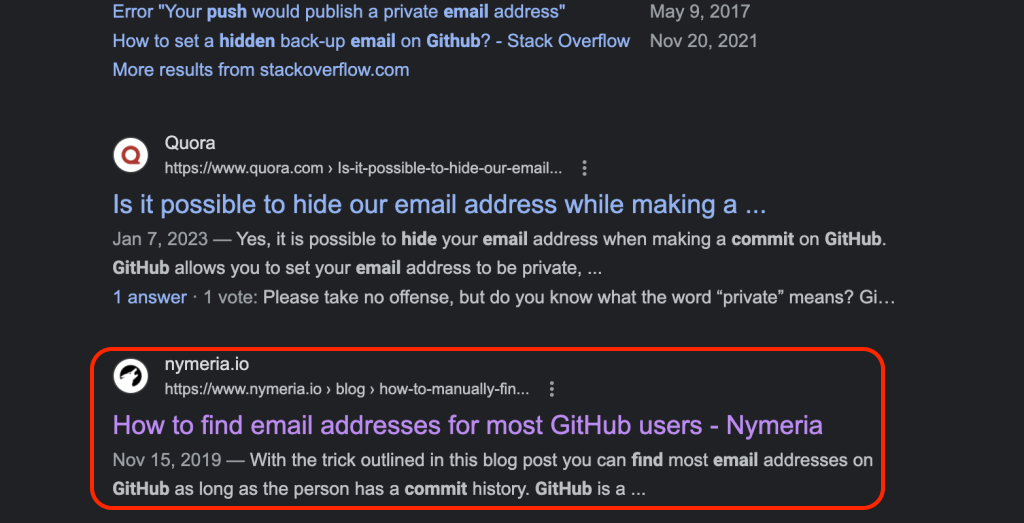
This article is pretty extensive – so here is a LINK to it for you to peruse at your leisure.
The ‘how’ to get the user’s email address is to find one of their commits and then add .patch at the end of it. That means we have to find a repository that actually as commits first.
I clicked on his ‘Python’ repository because I figured that would be the one that most likely had commits done to it. He has a few other repositories though, so I noted those down as well.
Sure enough – when we go into the repository, we see that he actually has two commits for us to play with:

So let’s go see them:

Nice, both of these are done buy our POI – so let’s add that .patch to one of them. I clicked on the top one and the URL that came up was this:
https://github.com/shadow-arkwave/python/commit/0f4c29465975df17e255013e33739cf83a9d84aeNow all we have to do is add the .patch to that one and see what happens. I’ll let you do that on your own though.
Q2 – How old is the email?
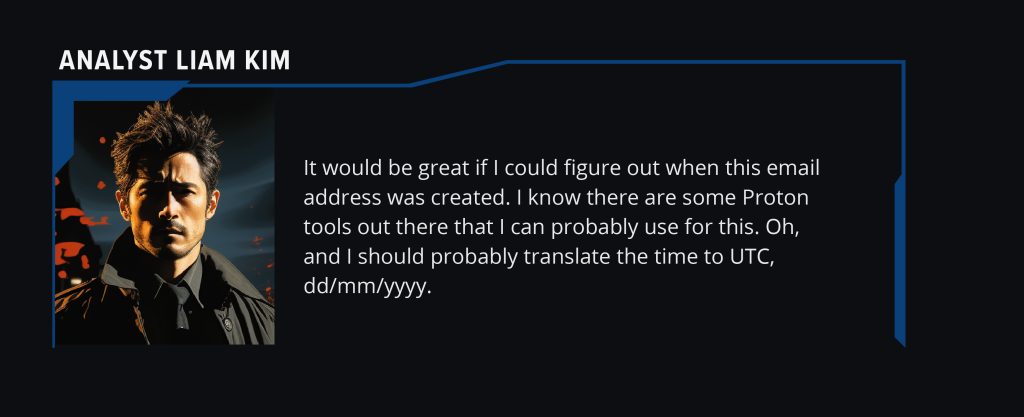
Now we need to check out the age of the Proton mail account – so let’s see what we can find on this.
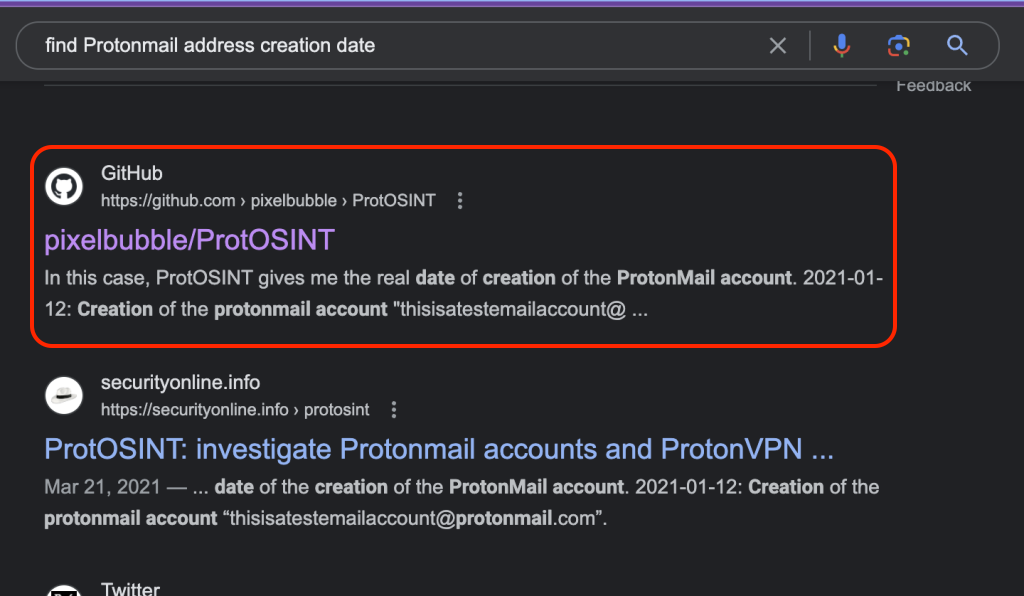
I did a couple of google searches one for protonmail age that didn’t turn up much other than Protonmail help articles. The second one I did was find protonmail address age and essentially the same results showed up. So, I decided to take the question more literally and used the exact wording from the question and searched find Protonmail address creation date and that got me a pretty good result:
As you can see – this is another CLI tool, and it is slightly more complicated then the last, so let me give you a few things that you will need to do this without throwing your computer across the room.
Well, if you’re on a Mac, I can’t help y’all with PCs
- Install Python3 and remember that you’re using Python3 – the Python command without the 3 will make you want to fight a wall.
- Make sure that you have the
requestspackage installed - Put they python script somewhere easy to navigate through so you don’t have to either copy a super long file path or type
cd500 times
If you don’t know the basics to running a python script in general – here is a great run down on how.
But, now you’ve got ProtOSINT on your machine! Let’s see what it looks like, with this helpful gif on their readme.

And this is where I will leave you with this one – hit up the readme on the Protosint page if you need some more detail on how to use the tool.
Matt let me borrow your brain
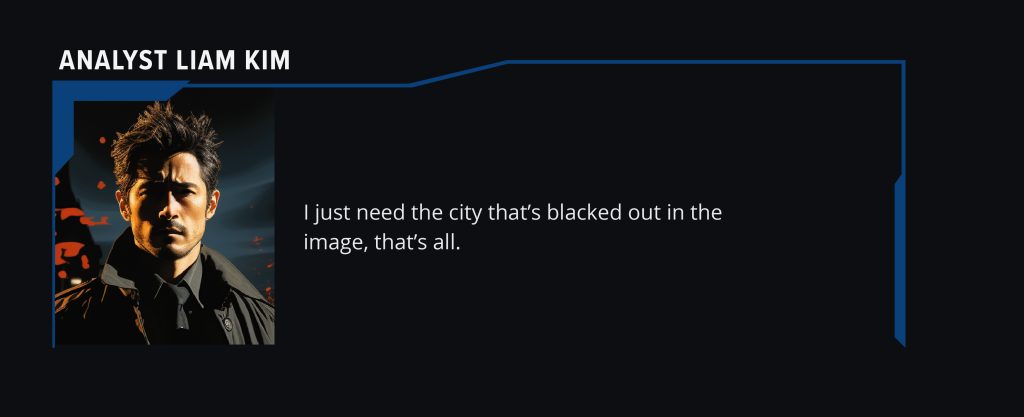
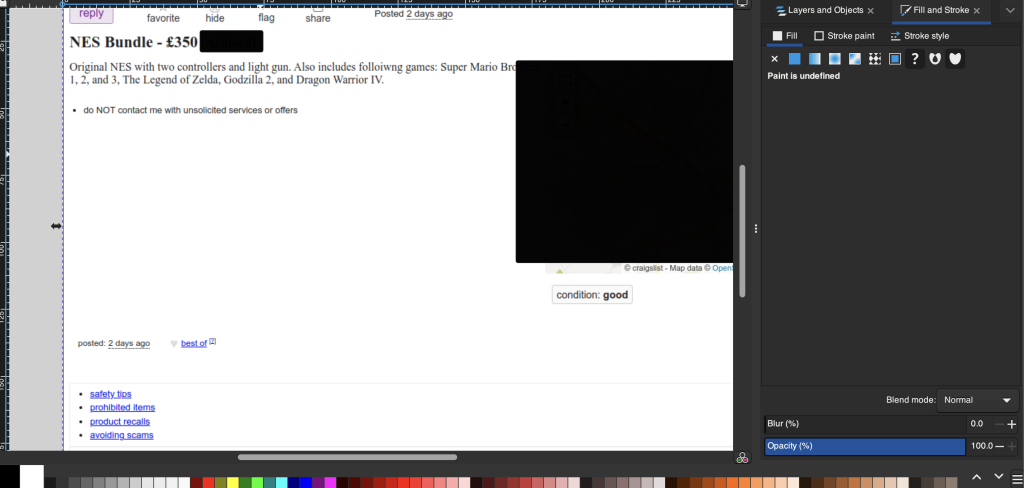
Q1 – What is the city that is blacked out in the image?
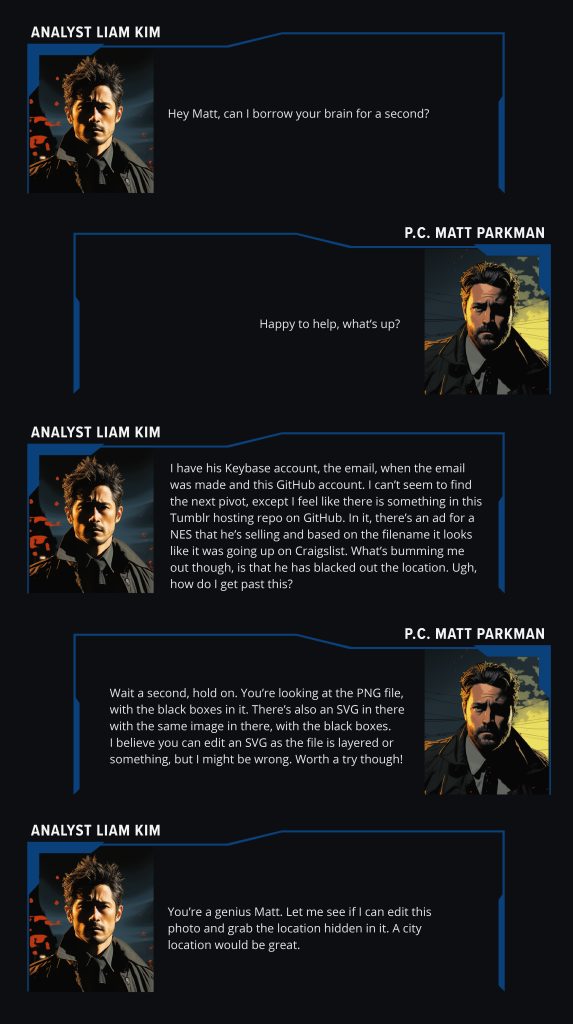
In this dialogue – they mention that there is an image in one of the repositories.
If you’ve been clicking through them like I do, you’ve probably seen it, but if you haven’t, I’ll leave it to you to find it before we move onto the next peices of this question.
Remember to read the dialogue thuroughtly to find it.
Once you get to the repo – you are presented with three files:

This question really had me stumped.
I threw all of the images in GIMP, to see what I could do with them, which wasn’t much. No layers or anything to move there that I could find on any of them.
GIMP is a free photo editing tool that I like to use instead of Photoshop, it’s got a fairly large featureset.
I ended up hitting up google again.
When I hit search, a youtube video came up – specifically for a tool named Inkscape. I should have watched the video, but I didn’t and just downloaded Inkscape immediantly


So! Let’s see what Inkscape can do.
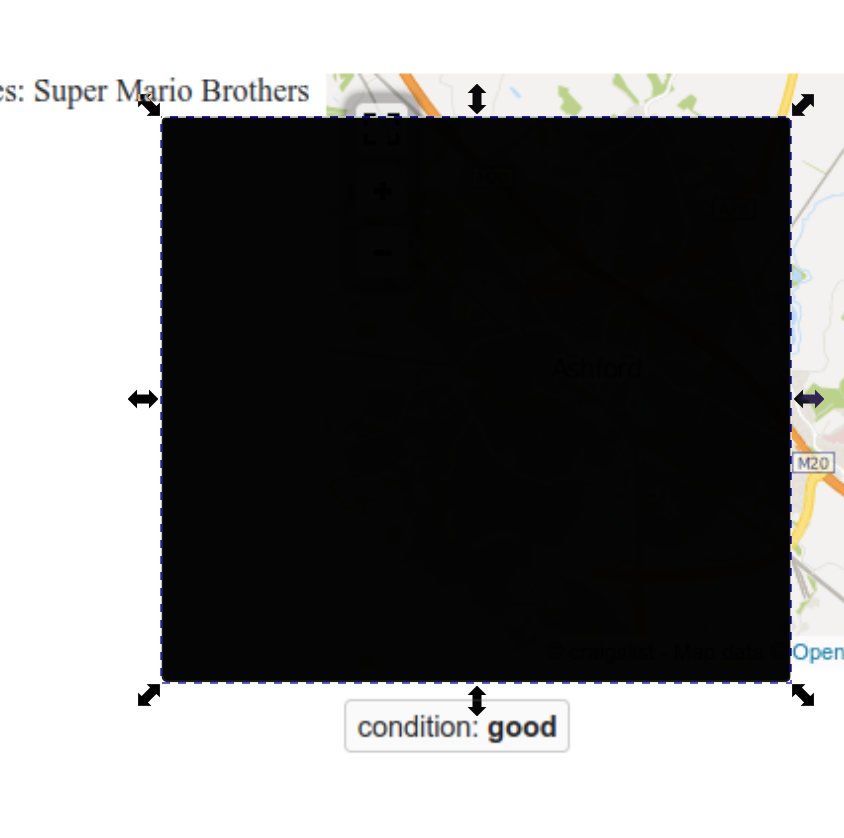
So as you can see above – I just selected the black square and am able to just drag it off of that map. Again, I will leave you there for the big reveal.
Tumblr Archive
Q1 – When was the NES posted for sale?
Next, Liam has noticed a Tumblr link in the GitHub profile, and that the image we just removed the black boxes from was for selling an NES and some games.
Hopefully you noticed those things too if you explored the account a bit.
So – let’s head to the Tumblr and see if we can find that post about the NES.
When we get to the Tumblr page, this is what we see at first.

If you scroll through the account though, you don’t see anything about selling an NES – so let’s dig a little deeper into Tumblr posts like P.C. Parkman suggested. More specifically the Tumblr archive.
Back to our very very old friend Google.
I really like the generative Ai beta, because it gives us 3 very relevant articles next to it.

I clicked on the first one because the title is exactly what we want.
In the article, this is the way they tell you to get to the archive:

So – I will let you do that yourself and see what you find!
Forever 64
Q1 – Who’s the person who left the note?
In this segment we are looking into a relation to the POI via their social media.
I love that this is in here, because when you’re doing something like a TraceLabs Capture The Flag, this is something that is very heavily used in order to identify relations to the missing persons you are looking into. I know that in the Defcon 31 CTF I did there were a ton of pivots on social media of close friends and family. Some of them also had multiple social media accounts, much like Ian in one of the earlier questions. Also, much like Ian, those older accounts had data and interactions that went back much further than the newer ones – giving more data points to document for the reports that would be sent to local law enforcement.
[If you don’t know what a Capture the Flag is, or who TraceLabs are, use the links here]
But, back to the question at hand!
We’re first looking at the notes on the post that we discovered in the previous question – so let’s look at those now.

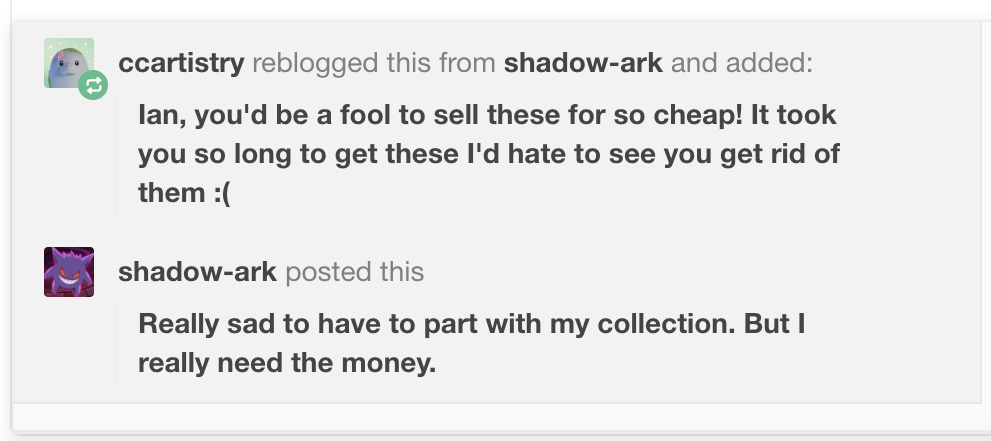
The only note on this post is from a ccartistry, who seems to be pretty close to Ian by the level of detail they know about how he got the games and console he’s selling. So let’s hit their Tumblr.
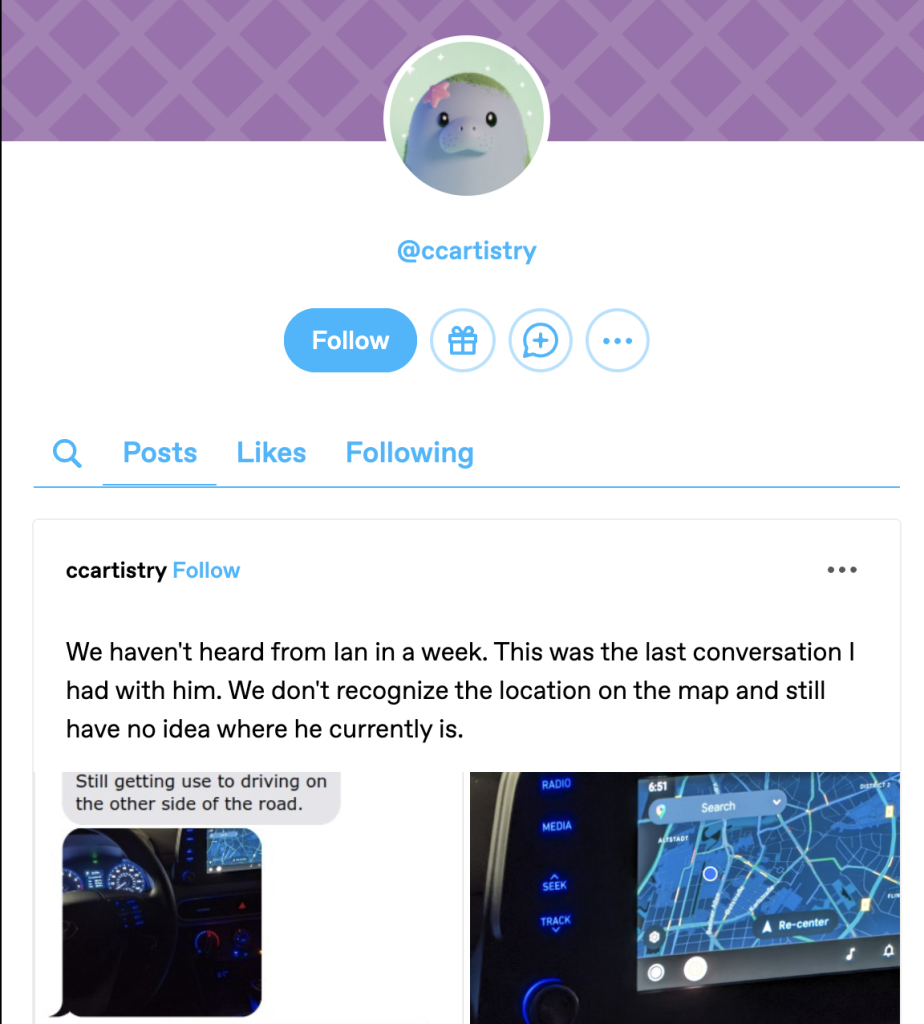
Hmmm… this first post seems to mention someone that we’re getting to know very well, I’ll leave you to dig into that a little more.
Opposite Day
Q1 – What is the make and model of the car that Ian is driving?

Now that we know it’s his sister posting about him, we have also found some interesting images that she received.
Identifying the make and model of the car that he is driving will definitely help out anyone who is looking for him, so let’s get to it!
Again, one of the first things I always do is throw the image into google images to see what comes back.
Nice, we got a decent hit – let’s try it.

Hmmm, nope, that’s not it.
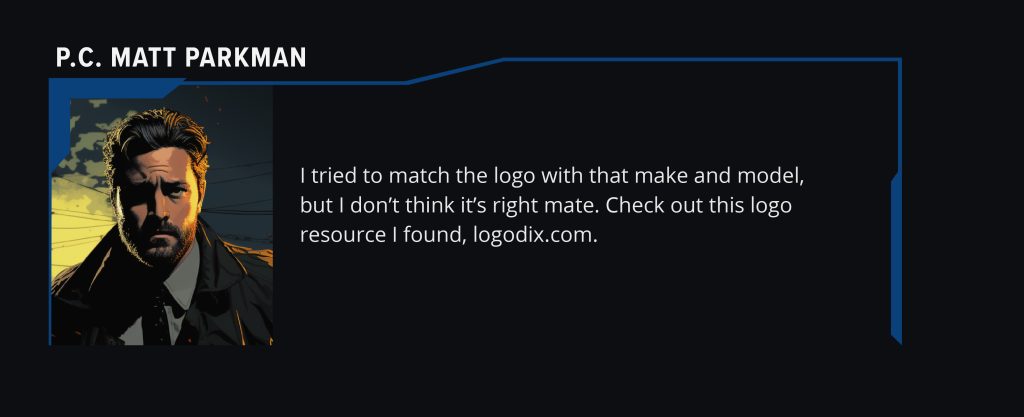
I know Matt just told us to go to logodix.com, but I want to try something else out first -there’s an image that’s different in the iMessage Ian’s sister posted, so let’s look into that one as well. I’ve cropped it down before I put it in google images.
And we’ve got another hit!
It looks like whatever car it is – it’s probably a Hyundai. Let’s try this new model with that and see what happens.

Nope, Matt’s back to tell us about the logo resource, but again, I’m stubborn and I have a quick idea to make this picture a little brighter.

I think this top picture looks a lot better than the one under it since I ramped up the exposure and contrast – so let’s try it.
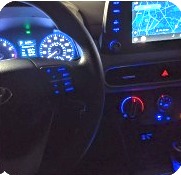

Well, we have three more kinds of Hyundai – and if you look at the logo on the steering wheel, it definitely looks like the right side of the Hyundai logo.
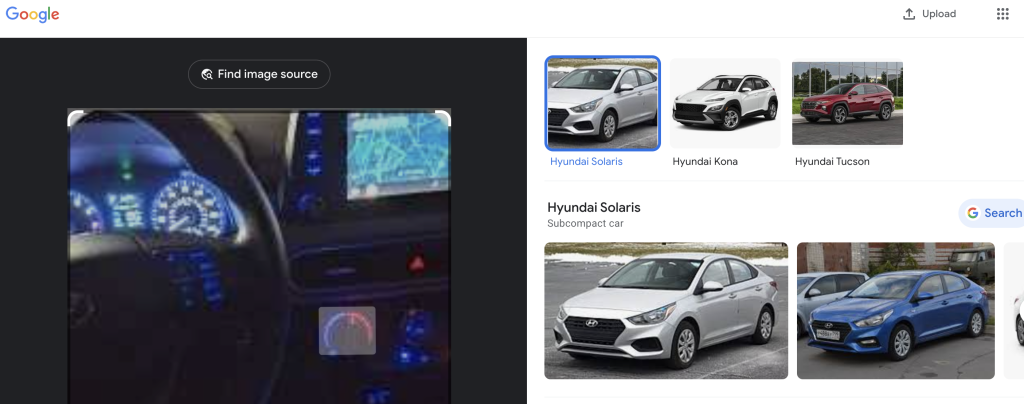
In this case, since we have so many things to choose from, I’m going to start image searching the dashboards on each of those cars to see if I can get a visual match with my own eyes that looks close enough to that steering wheel and dashboard configuration.
I won’t bore you with all of my image searches here – because I think you’ll have more fun doing it yourself.
Enhance
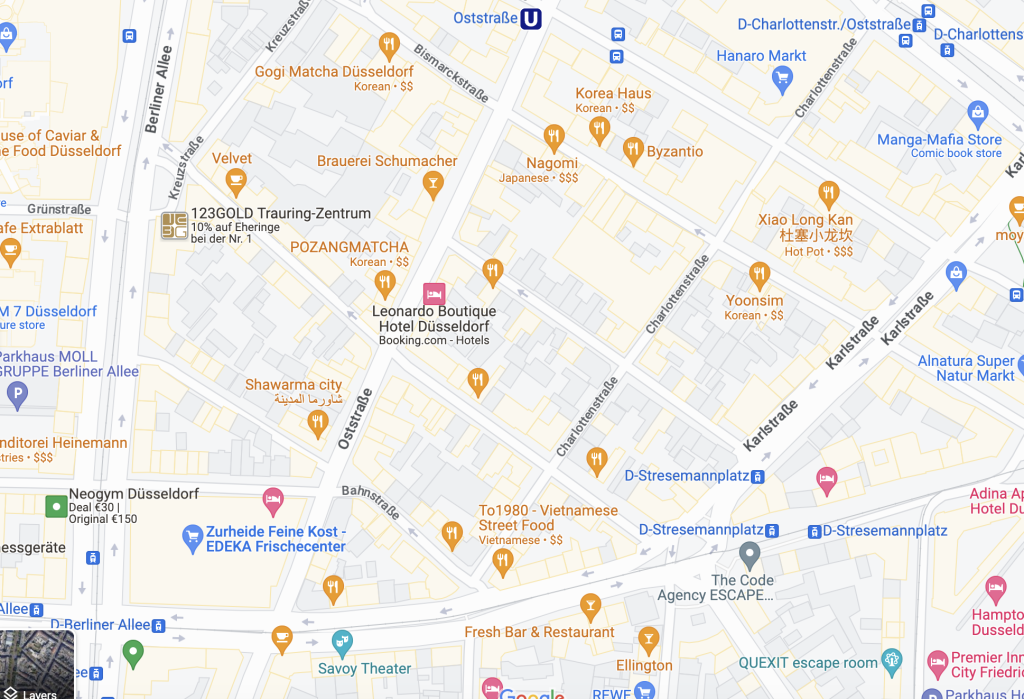
Q1 – What city is Ian in when he took the picture of the car?
Blade runner joke that made me laugh and my roommate look at me like ‘what in the world is funny about googling car dashboards?’ aside, lets give this image another look.

Again, much like with the profile picture, let’s extract all the data we have here before we start actively searching. The more you know before you start looking, a lot of times you get to the answer much faster and easier.
So what are we seeing here?
(This is by no means comprehensive, just what I take away from the image.)
- The application for the maps has a Google Maps symbol
- There seem to be two cities labeled:
- Aldstat
- District 2
- There seem to be 3 major roads named:
- Berliner Allee
- Oststraße
- Karlstraße
- Those roads all seem to intersect in a very specific pattern that is easy to visually match.
So we have a few peices of data to go on now – let’s start at the top: Aldstat
Currently I’m assuming that is a city, so if we can narrow down the search to cities with that name that will give us something to go from. So let’s see what Aldstat is.
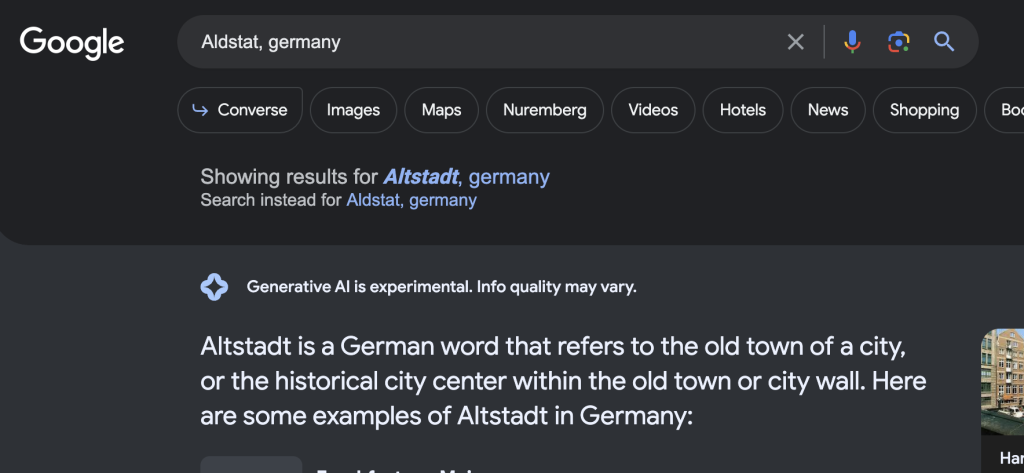
Nope, that’s not a city, so let’s try District 2:
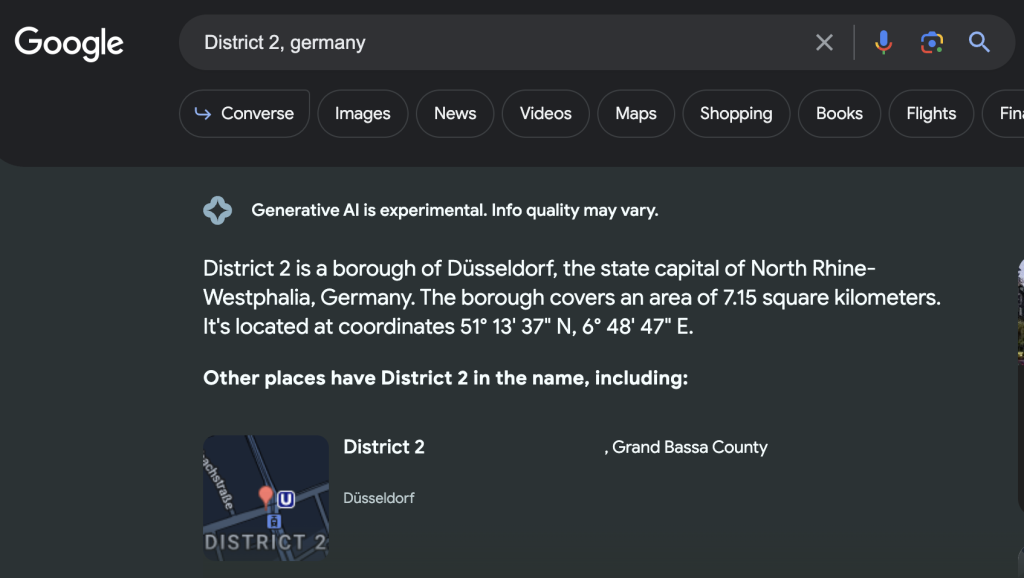
Nice, so it seems that Düsseldorf may be the answer, but I want to confirm this, so let’s look into those streets we noted down above.
- Berliner Allee
- Oststraße
- Karlstraße
Does this pattern look familiar? I’ll leave it to you to decide.
Q2 – Where do the Pokémon Go?
Matt has managed to find us more work to do again, but that’s the way we like it!
Now we’re using the horrible operational security of that Pokémon Go account. Let’s see what we can find with it.
Matt has given us a link to this image:

Now, much like before, let’s look at all the information we have in this image.
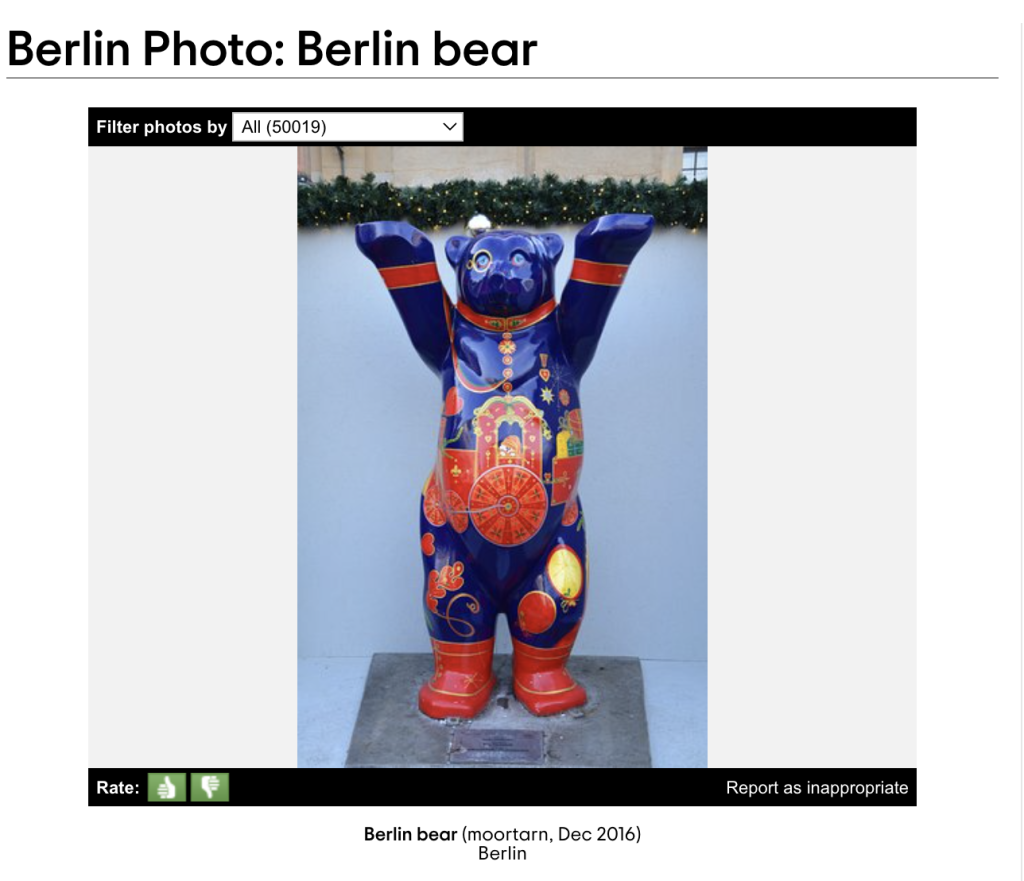
- Squirtle – he’s cool, but not sure how helpful he’ll be
- There is a picture of what appears to be a bear wearing a sash, so this will probably be the physical thing the Pokémon Go stop is associated with.
- I’m assuming finding this bear should give us the address of wherever the Poké Stop is.
- The note says ‘Greetings from Welcome – Bär’
Again – much like any image I have, we’re going to throw it in Google Images, I’m going to crop it down to just the bear first though.
Let’s see how this goes.

What catches my eye here – is a bear in the exact same stance, and the title mentions Berlin, Germany.
While that’s not Düssledorf, it seems to definitely connect the bear to Germany. Also, we don’t know if Ian is even still in Düssledorf, that’s an assumption being made. Let’s see about this other bear.
Okay, that doesn’t give us much information at all. Let’s pivot to something else.
At this point, I remember that Yandex exists, and is MUCH better at image recognition than Google. So let’s go there and try out the bear picture.
Oh hey, this looks promising:
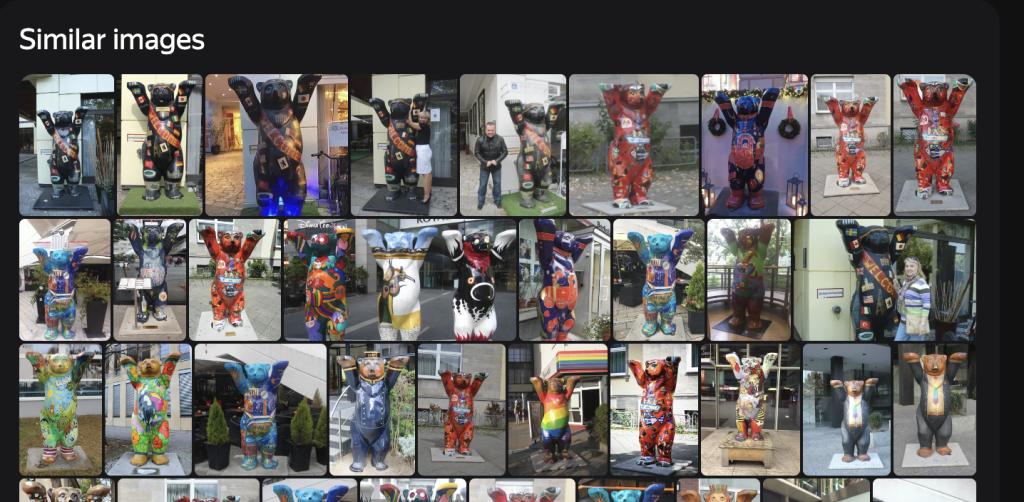
As I clicked through the pictures of our bear friend, I made sure to keep an eyeball on the background as well as anything that may be different between them.
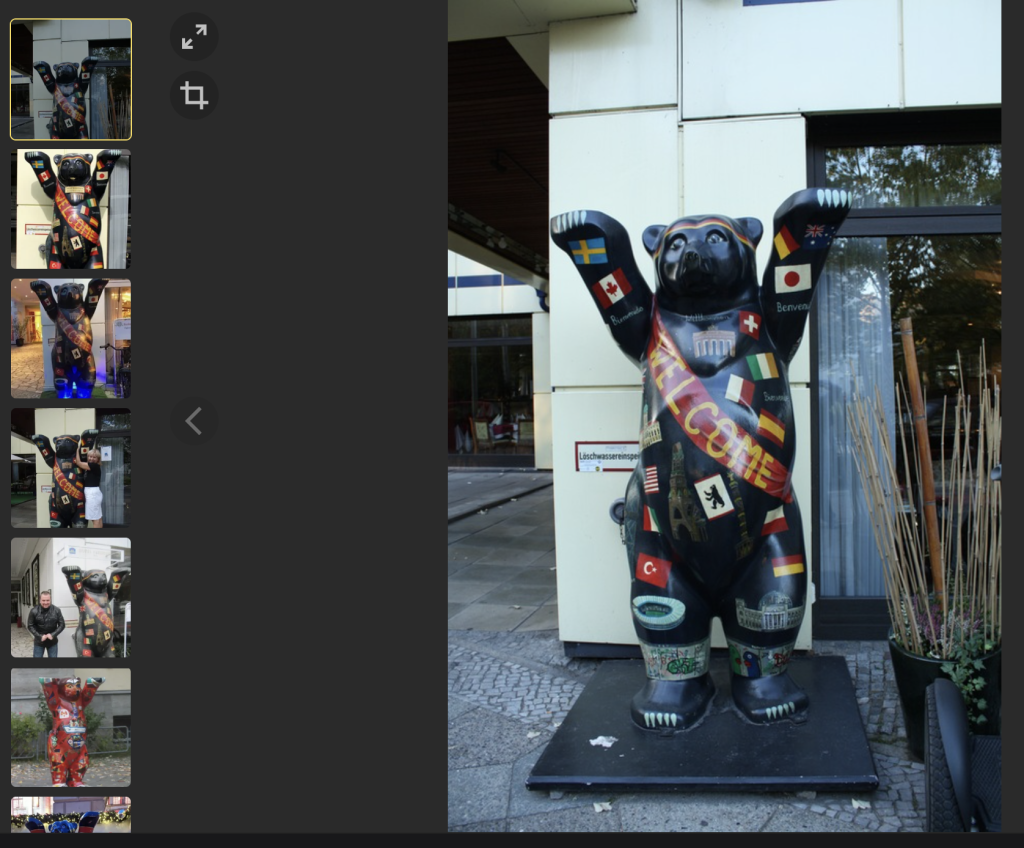
When I got the address, I then referenced a map of Pokéstops to confirm that this is in fact the address of a Pokéstop as well, and that should get you the address and confirm it.
Congratulations! We’ve helped find our POI!
Make sure to celebrate by going through the rest of the story, I’m sure you’ll enjoy it as much as I did.
I hope you’ve had as much fun doing this walkthrough as I have creating it, this scenario really opened my eyes to the fact that ‘Social Media’ is not just Facebook, Twitter and other mainstream things. It’s also the less thought of sites, like Pokémon Go.
If you still need some more people to bounce ideas off of, I highly reccomend joining the KASE discord server, it’s full of beta testers, other Scenario Takers, and even Espen and Rae, the founders of KASE!
Come check us out and say hi, we love meeting new people!
Final Thoughts
As I mentioned before, I really liked this KASE Scenario. It gets into more technical skills, which as someone who has dabbled with a lot of various technical skills in my day job as a Technical Product Manager (TPdM), I loved seeing the crossover of that within OSINT.
It’s also great how these skills were introduced, they are just difficult to be interesting, but not too hard for you to get through them.
The social media intelligence in these scenarios also continues to be great, because there is a lot of social media in this KASE Scenario that you wouldn’t initially think of as social media, and that really gets you to think a bit wider if you’re working on a case or even doing a CTF.
And what is a better skill in OSINT than being able to think more broadly and creatively on what data will help you to your next step?
3 Comments
I really like the layout of the workup on this scenario. i was wondering how many hours did it take for this scenario to be completed? I have purchased all 4 scenarios. I think these are a great way to learn OSINT.
Thank you! I’m glad it’s helpful!
I think this one took me 2-3 hours of work, so not counting any breaks I took.
I’ve definitely learned a ton from all of the scenarios, and they’re all really fun too. I hope you enjoy them as much as I did!
Thanks for the detailed write-up. I didn’t need it to answer the questions but I like to compare the way other people solve those challenges to mine. And your write-up is well-written and nice to follow.